간단한 게시판 만들기 중...
계속 보다보니까 앞뒤가 안 맞는 것들이 보인다.
이번엔, 게시글 작성자만 수정할 수 있게 하는 기능을 추가했다.
정확히는 추가라기 보다는, 기존 기능을 수정했다고 보는 게 맞을 것 같다.
[수정 전]
- ADMIN 권한을 가진 user만 게시글을 등록하고 수정할 수 있음
- 나머지는 조회만 가능
- 하지만 ADMIN 권한만 가지고 있다면, 본인이 등록한 게시물이 아니어도 수정할 수 있음
[수정 후]
- 본인이 등록한 게시물만 수정할 수 있음
✔️ 수정 순서
- 게시물 Dto에 username 속성 추가
- 게시물 엔티티의 createBy를 가져와 username에 저장한다.
Service를 수정하기 전,
게시물을 조회하는 Controller의 코드를 보자.
[Controller]
// 게시물 상세보기
@GetMapping(value = "/recipe/{recipeId}")
public String recipeDtl(Model model, @PathVariable("recipeId") Long recipeId) {
    RecipeFormDto recipeFormDto = recipeService.getRecipeDtl(recipeId);

    recipeService.updateView(recipeId); // views ++
    model.addAttribute("recipe", recipeFormDto);

    return "recipe/recipeDtl";
}- Service에서 게시물 Dto(위의 코드에선 recipeFormDto)를 조회한 결과인 Dto를 View에 넘긴다.
이제 코드를 수정해보자.
먼저 게시물 Dto에 username을 추가한다. (엔티티는 그대로 놔둠)
/**
 * 게시물 데이터 정보를 전달하는 DTO
 * */
@Getter
@Setter
public class RecipeFormDto {

    ...

    // 작성자 정보 저장 : createBy
    private String username;

    ...

}
그 다음 Service에 추가해보자.
[기존 Service]
/**
 * 등록된 게시물을 불러옴
 * */
@Transactional(readOnly = true)
public RecipeFormDto getRecipeDtl(Long recipeId){

    ...

    Recipe recipe = recipeRepository.findById(recipeId)
            .orElseThrow(EntityNotFoundException::new);

    ...

    return recipeFormDto;
}
[수정 후 Service]
/**
 * 등록된 게시물을 불러옴
 * */
@Transactional(readOnly = true)
public RecipeFormDto getRecipeDtl(Long recipeId){

    ...

    Recipe recipe = recipeRepository.findById(recipeId)
            .orElseThrow(EntityNotFoundException::new);

    if(recipe.getCreatedBy() != null) {
        recipeFormDto.setUsername(recipe.getCreatedBy());
    }

    return recipeFormDto;
}- 게시물 엔티티의 등록자(CreateBy)를 조회한다.
- 조회 결과가 있으면(!= null) 게시물 Dto의 username에 엔티티의 등록자(CreateBy)를 세팅한다.
다음은 ViewPage에 추가한다.
난 Thymeleaf로 했다.
먼저 들어가기 전, 현재 로그인 한 user와 게시물 등록자의 정보를 테스트 해보고 싶다.
[Thymeleaf]
<b>Authenticated username:</b>
<div sec:authentication="name"></div>
<div class="h4" th:text="${recipe.username}"></div>
위의 코드를 추가하면 결과 화면은 다음과 같이 나온다.
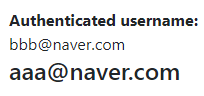
- Authenticated username : 현재 로그인한 사용자의 정보이다.
- 스프링 시큐리티에서는 username이 사용자의 이름이 아닌 사용자의 ID이다.
- 나의 경우에는 username을 email로 설정했다.
- email 필드를 unique로 지정했기에 가능한 것이다.
- 이 부분은 각자의 엔티티 조건에 맞춰 코드를 변경한다.
- 나의 경우인 recipe.username은 위에서 설정한 게시물 등록자이다.
더 자세한 정보는 다음과 같다. (출처)
<!--ROLE_USER 권한을 갖는다면 이 글이 보임-->
<h1 sec:authorize="hasRole('ADMIN')">Has admin Role</h1>

<!--ROLE_ADMIN 권한을 갖는다면 이 글이 보임-->
<h1 sec:authorize="hasRole('USER')">Has user Role</h1>

<!--어떤 권한이건 상관없이 인증이 되었다면 이 글이 보임-->
<div sec:authorize="isAuthenticated()">
    Only Authenticated user can see this Text
</div>

<!--인증시 사용된 객체에 대한 정보-->
<b>Authenticated DTO:</b>
<div sec:authentication="principal"></div>

<!--인증시 사용된 객체의 Username (ID)-->
<b>Authenticated username:</b>
<div sec:authentication="name"></div>

<!--객체의 권한-->
<b>Authenticated user role:</b>
<div sec:authentication="principal.authorities"></div>
테스트를 통한 확인은 끝났으니, 본격적으로 view 코드를 추가해보자.
[Thymeleaf]
<div class="text-right" sec:authorize="hasAnyAuthority('ROLE_ADMIN')"
     th:if="${#authentication.principal.username} == ${recipe.username}" >
    <button type="button" class="btn btn-light border border-primary btn-lg"
            th:onclick="'location.href=\'/admin/recipe/'+ @{${recipe.id}}+ '\''">게시물 수정</button>
</div>- sec:authorize="hasAnyAuthority('ROLE_ADMIN')"
- ADMIN 권한을 가진 사람만 div가 보인다.
- th:if="${#authentication.principal.username} == ${recipe.username}"
- 위에서 확인한 스프링 시큐리티의 username과 게시물 등록자가 같다면, div가 보인다.
- 즉, 위의 두 조건을 만족한 사람만 '게시물 수정' 버튼이 보이는 것이다.
코드를 모두 수정했으니
마지막으로 결과를 확인해보자.
[조건]
- aaa@naver.com은 test1 게시물을 등록한다.
- bbb@naver.com은 test2, test3 게시물을 등록한다.
[예상 결과]
- 로그인을 하지 않은 사용자에겐, '수정' 버튼이 보이지 않는다.
- aaa@naver.com은 test1 게시물에 '수정' 버튼이 보인다.
- aaa@naver.com은 test2, test3 게시물에 '수정' 버튼이 보이지 않는다.
- bbb@naver.com은 test1의 수정 버튼이 보이지 않고, 2, 3는 보인다.
다음은 로그인을 하지 않은 상황의 결과 화면이다.
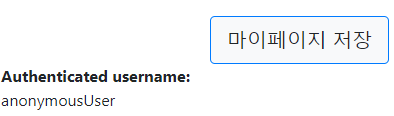
- anonumousUser이고, 수정버튼이 보이지 않는다.
- ※ 마이페이지 저장 버튼을 누를 시엔 로그인 화면으로 이동한다.
다음은 aaa@naver.com으로 로그인한 결과이다.
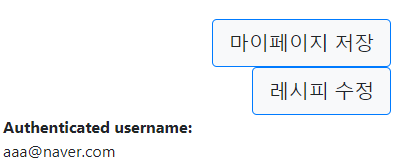
- test1 게시물의 화면이다.
- 수정 버튼이 잘 보인다.
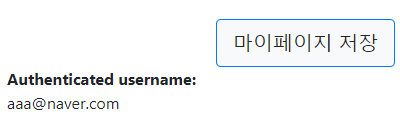
- test2, test3 게시물의 화면이다.
- 수정 버튼이 보이지 않는다.
다음은 bbb@naver.com으로 로그인해보자.
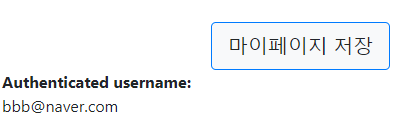
- test1 게시물엔 수정 버튼이 보이지 않는다.

- test2, test3 게시물엔 수정 버튼이 보인다.
의도한 결과가 나왔다.
- 끝 -
'프로젝트' 카테고리의 다른 글
| Session 기반 인증과 Token 기반 인증의 차이가 뭘까? (2) | 2023.02.20 |
|---|---|
| Custom Exception 해보기 (0) | 2023.02.19 |
| 게시물 조회수 구현, @Query (0) | 2023.02.17 |
| CRUD를 분석해보자 (2) - 게시글 수정/삭제/조회 API (0) | 2023.02.11 |
| CRUD를 분석해보자 (1) - 게시글 생성 API (0) | 2023.02.11 |